작성자: Ospace (ospace114 at naver.com) http://discount77.com/blog/ospace
Source : http://www.codeproject.com/macro/IncBuildNrMacro.asp
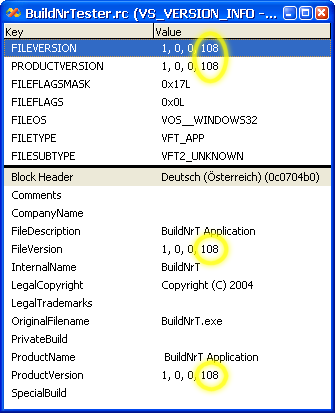
아래 FILEVERSION, PRODUCTVERSION, FileVersion, ProductVersion에 맨 뒤에 숫자를 자동으로 1씩 증가시킨다.

기능이나 설치 방법은 아래 저자글 참고.
기존 VC 2003까지 지원되는 것이나 VC 2005에서도 이상없이 지원된다. 그러나, 자동 빌드넘버 증가를 사용하지 않으려면 rc 파일에 아래 정의를 해준다.
#define Disable_IncBuildNrMacro
그러나, 계속 빌드넘버가 증가하게 되어 제어할 수 없다. 원인은 뭔지 모른다.
Functionality
My macro implementation reacts on the DevStudio's event when a build starts. The macro scans resource files (.RC extension only) in all projects of the current solution. All files not having the extension .RC will be skipped.
In a resource file, the macro will search for all VERSIONINFO definitions, and inside there, it will increment the build numbers for all 4 statements FILEVERSION, PROJECTVERSION, "FileVersion" and "ProjectVersion". It will handle multiple language blocks, too (if present).
To disable parsing a .RC file, specify the following line of code somewhere in the .RC file:
#define Disable_IncBuildNrMacro
If you don't specify this line or if it is remarked out, then the .RC file will be parsed and build numbers will be incremented.
DevStudio language related notes:
At the start of a build process, the IncBuildNr macro will output information messages about success or failure of manipulating the .RC files or when .RC files have been skipped. The messages will be posted into the output-window's Build pane where the compiler inserts its own progress information, too. The macro is implemented for English versions of the DevStudio. If your DevStudio has a different language, it can be, that the macro does not find the correct output-window-pane. This can happen, because the macro simply opens a pane named "Build". If in your DevStudio, the output-window-pane for build progress information is named differently, it is recommended to change the pane name in the macro sources accordingly (in module EnvironmentEvents, in function BuildEvents_OnBuildBegin()).
Further description you can find in the macro sources themselves (when you open it in the DevStudio's Macro Editor).
Installation Instructions
First, go to the location of your Visual Studio macros. By default, this is Personal\Visual Studio Projects\VSMacros. In there, create a subdirectory named IncBuildNrMacro and copy the file IncBuildNrMacro.vsmacros in there.
Now, open the VC++ .NET DevStudio, open the Macro Explorer, right click on the root item "Macros", and select "Load Macro Project". Open IncBuildNrMacro.vsmacros. A warning appears informing you that the loaded macro contains event handling code. Select "Enable event handling code", and press OK. This is required, otherwise the macro would not react on build starts.
That's it. The next time you build a project, the IncBuildNr macro will be invoked automatically.
Uninstallation Instructions
In VC++ .NET DevStudio, go to the Macro Explorer, right click on "IncBuildNrMacro" and select "Unload Macro Project". You can delete the IncBuildNrMacro.vsmacros file now, if you like to.
'3.구현 > VC++' 카테고리의 다른 글
| Dialog 기반 프로그램에서 OnIdle (WM_IDLE) 구현하기 (WM_KICKIDLE사용) (2) | 2007.01.30 |
|---|---|
| [수정중]윈도우에서 GetWindowRect, GetCllientRect를 통해 크기 얻기 (2) | 2006.11.23 |
| ActiveX 사용한 CListView 사용자 컨트롤 (0) | 2006.11.16 |
| ActiveX 컨트롤의 제작과 배포 (0) | 2006.11.16 |
| 안정성을 보장하는 ActiveX 컨트롤 제작 (0) | 2006.11.16 |
 invalid-file