들어가기
자바에서 이미지를 처리하기 위한 자체 라이브러리로 ImageIO가 있다. 그리고 추가적인 이미지 처리는 awt에 있는 라이브러리를 사용할 수 있다. 이를 이용해 이미지를 합성, 이미지 크기 변경 등 다양한 이미지 처리 작업을 할 수 있다. 별다른 라이브러리 설치나 프로그램을 사용하지 않고 쉽고 간단하게 처리할 수 있다는 장점이 있다. ImageIO을 사용하는 방법을 살펴보자.
작성자: http://ospace.tistory.com/ (ospace114@empal.com)
지원하는 포멧
ImageIO는 만능 그래픽 처리 라이브러리가 아니다. 그래도 많은 포멧을 지원하고 있다.
String readFormats = String.join(",", ImageIO.getReaderFormatNames());
System.out.println("support formats to read: " + readFormats);
String readSuffixes= String.join(",", ImageIO.getReaderFileSuffixes());
System.out.println("support suffixes to read: " + readSuffixes);
String writeFormats = String.join(",", ImageIO.getWriterFormatNames());
System.out.println("support formats to write: " + writeFormats);
String writeSuffixes = String.join(",", ImageIO.getWriterFileSuffixes());
System.out.println("support suffixes to write: " + writeSuffixes );
지원하는 포멧 이름을 getReaderFormatNames()와 getWriterFormatNames()로 확인할 수 있다. 이름 중에 중복된 부분이 있어서 getReaderFileSuffixes()나 getWriteFileSuffixes()로 중복 없이 지원하는 포멧을 확인할 수 있다.
- Read: jpg, tif, tiff, bmp, gif, png, wbmp, jpeg
- Write: jpg, tif, tiff, bmp, gif, png, wbmp, jpeg
지원하는 포멧에서 tif와 tiff은 같은 포멧이고, jpg와 Jpeg도 같은 포멧이다. 그러면 실제로는 6개 포멧을 지원하고 있다.
리사이징
먼저 간단하게 이미지 크기를 변경하는 방법을 살펴보자. 이미지 크기 변경은 보통 썸네일 이미지 생성에 많이 사용한다. 먼저 크기를 변경할 이미지를 로딩한다.
BufferedImage img = ImageIO.read(new File("img1.jpg"));
System.out.println("size: " + img.getWidth() + "x" + img.getHeight());
ImageIO.read()을 통해 이미지 파일을 읽어 온다. 그리고 이미지 데이터는 BufferedImage 객체로 리턴된다. BufferedImage 객체에서 필요한 이미지 정보를 획득할 수 있다.
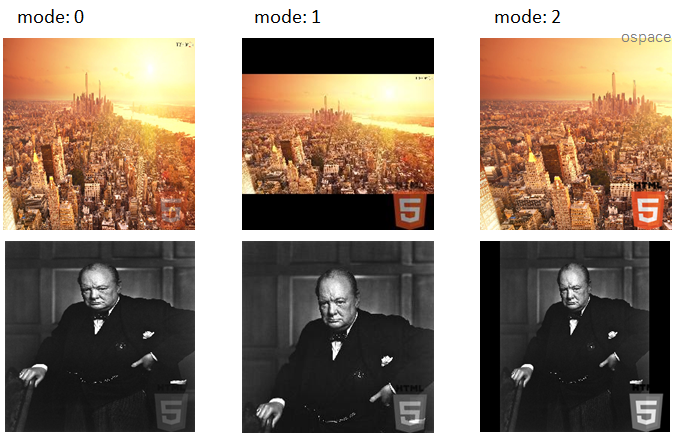
다음으로 불러온 이미지 크기 정보를 사용해서 원하는 크기로 변경하려면 폭과 높이 계산이 필요한다. 이미지 크기를 원하는 크기로 변경할 때에 종횡비율을 유지하면서 크기를 변경할 경우 계산이 필요하다. 이미지가 가로 방향 또는 세로 방향일 경우 크기가 변경된 이미지가 가로 방향인지, 세로 방향인지 또는 확대되는지 축소되는지에 따라서 여러선택사항이 있을 수 있다. 물론 종횡 비율을 유지하지 않을 경우 그냥 해당 크기대로 이미지 크기를 조정하면 된다.
아래 경우는 종횡비율을 유지하면서 원본 이미지가 가로모드(mode=1)로 표시할지 세로 모드(mode=2)로 표시할지를 선택하여 계산하도록 했다.
// 리사이즈할 크기 계산
int mode = 1;
int width = 512, height = 512;
int resizeWidth = width, resizeHeight = height;
int x = 0, y = 0;
switch (mode) {
    case 1 :
        // 가로 모드
        if (img.getWidth() > width) {
            resizeHeight = height * img.getHeight() / img.getWidth();
            y = resizeHeight < height ? (height - resizeHeight) >> 1 : 0;
        }
        break;
    case 2 :
        // 세로 모드
        if (img.getHeight() > height) {
            resizeWidth = width * img.getWidth() / img.getHeight();
            x = resizeWidth < width ? (width - resizeWidth) >> 1 : 0;
        }
        break;
}
width와 height은 크기가 변경된 이미지 크기를 의미한다. x와 y는 결과 이미지의 좌측 상단 위치를 의미한다. 그리고 resizeWidth와 resizeHeight은 원본 이미지에서 최종 변경되는 이미지 크기이다. 현재는 두가지 조건에 대해서만 처리하고 있다.
그리고 최종 저장할 이미지 데이터를 보관할 BufferImage 객체를 생성한다.
int type = 0 == img.getType() ? BufferedImage.TYPE_INT_ARGB : img.getType();
// 리사이징된 이미지 생성
BufferedImage resizeImg = new BufferedImage(width, height, type);
현재 이미지 타입을 가지고 생성하지만 만약 없다면 기본 ARGB로 생성한다.
다음으로 이미지 처리를 위한 그래픽 컨텍스트를 생성하고 이미지 크기 변경을 위해 사용할 안티앨리어싱을 지정한다.
// 그래픽스 컨택스트 생성
Graphics2D g = resizeImg.createGraphics();
// 안티앨리어싱 설정
g.setRenderingHint(RenderingHints.KEY_ANTIALIASING,
        RenderingHints.VALUE_ANTIALIAS_ON);
생성된 BufferedImage객체에 원본 이미지를 x, y위치에 크기가 resizeWidth, resizeHeight 크기로 변형해서 복사한다. 그럼 그래픽스 컨텍스트 객에에 연결된 resizeImage인 BufferedImage에 저장된다.
g.drawImage(img, x, y, resizeWidth, resizeHeight, null);그리고 항상 주의할 부분은 모든 처리가 끝났으면 생성된 그래픽스 컨택스트를 해제해야 한다.
g.dispose();마지막으로 이미지 크기가 변경된 BufferedImage 객체를 파일로 기록한다.
ImageIO.write(resizeImg, "jpg", new File("result.jpg"));파일 포멧은 “jpg”로 지정해서 저장하고 있다. 그렇게 이미지 처리가 크게 어렵지 않게 처리된다.
이미지 오버레이
다음으로 두개 이미지를 하나로 합치는 예제를 보자. 두 개 이미지를 하나로 합치는 예제는 워터마킹으로 활용될 수 있다.
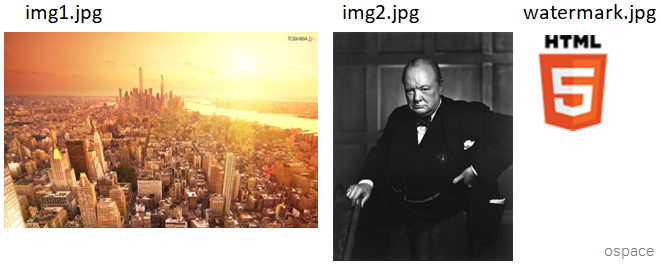
먼저 처리할 두 개 이미지를 BufferedImage객체로 로딩한다.
BufferedImage img1 = ImageIO.read(new File("img1.jpg"));
BufferedImage img2 = ImageIO.read(new File("img2.jpg"));
두개 이미지를 합성하기 위해 두컴포지트를 생성한다.
// 함성용 알파 컴포지트 생성
AlphaComposite comp = AlphaComposite.getInstance(AlphaComposite.SRC_OVER, 0.3f);
// 그래픽 컨텍스트 생성
Graphics2D g = img1.createGraphics();
// 사용할 알파 컨포지트 설정
g.setComposite(comp);
이미지 합성을 위해 두개 이미지를 겹치는 AlphaComposite.SRC_OVER를 사용한 컴포지트를 생성한다. img1이 img2위에 겹쳐서 그려진다. 그리고 대상 이미지에 생성한 컴포지트를 적용한다.
다음으로 그려질 이미지 위치를 계산한다.
int x = img2.getWidth() - img1.getWidth();
int y = img2.getHeight() - img1.getHeight();
위치 x, y는 img1에서 img2의 크기만큼 뺀 위치로 오른쪽 하단에 위치하게 된다.
마지막으로 계산된 위치에 img2 이미지를 배치시킨다. 그리고 사용이 끝난 컴포지트를 해제한다.
g.drawImage(img2, x, y, null);
g.dispose();
마지막으로 jpg 이미지로 저장한다.
// 이미지 저장
ImageIO.write(img, "jpg", new File("result.jpg"));
간단하게 이미지 합성까지 살펴보았다. AlphaComposite에서 사용한 합성 방식을 제공하고 있다.
CLEAR, DST, DST_ATOP, DST_OUT, DST_OVER, SRC, SRC_IN, SRC_OUT, SRC_OVER, XOR이 제공된다. 저도 이 모든 것을 알지 못해서 필요할 때마다 찾아서 적용했었다.
ImageUtils(Java 버전)
마지막으로 이 모든 작업을 매번 작업하기 힘들기 때문에 간단하게 헬퍼클래스를 만들어서 사용하면 좋다고 생각해서 한번 만들어보았다.
public class ImageUtils {
    public static BufferedImage open(String filepath) throws IOException {
        return ImageIO.read(new File(filepath));
    }

    public static BufferedImage resize(BufferedImage image, int width, int height, int mode) {
        int x = 0, y = 0;
        int resizeWidth = width, resizeHeight = height;
        switch (mode) {
            case 1 :
                if (image.getWidth() > width) {
                    resizeHeight = height * image.getHeight()
                            / image.getWidth();
                    y = resizeHeight < height
                            ? (height - resizeHeight) >> 1
                            : 0;
                }
                break;
            case 2 :
                if (image.getHeight() > height) {
                    resizeWidth = width * image.getWidth() / image.getHeight();
                    x = resizeWidth < width ? (width - resizeWidth) >> 1 : 0;
                }
                break;
        }

        int type = 0 == image.getType()
                ? BufferedImage.TYPE_INT_ARGB
                : image.getType();
        BufferedImage resizeImg = new BufferedImage(width, height, type);
        Graphics2D g = resizeImg.createGraphics();
        g.setRenderingHint(RenderingHints.KEY_ANTIALIASING,
                RenderingHints.VALUE_ANTIALIAS_ON);
        g.drawImage(image, x, y, resizeWidth, resizeHeight, null);
        g.dispose();

        return resizeImg;
    }

  public static void overlay(BufferedImage baseImage, BufferedImage overlayImage, int x, int y, float alpha) {
        AlphaComposite comp = AlphaComposite
                .getInstance(AlphaComposite.SRC_OVER, alpha);
        Graphics2D g = baseImage.createGraphics();
        g.setComposite(comp);
        g.drawImage(overlayImage, x, y, null);
        g.dispose();
    }

    public static void save(BufferedImage image, String filepath) throws IOException {
        int p = filepath.lastIndexOf(".");
        String ext = 0 > p || (filepath.length()-1 == p) ? "jpg" : filepath.substring(p+1);
        ImageIO.write(image, ext, new File(filepath));
    }
}
이를 활용해서 앞에 다룬 예제를 적용해보자. 이미지 리사이즈와 오버레이를 같이 사용한 예제이다.
BufferedImage img = ImageUtils.open("img1.jpg");
BufferedImage watermark = ImageUtils.open("watermark.jpg");
img = ImageUtils.resize(img, 512, 512, 0);
int x = img.getWidth() - watermark.getWidth();
int y = img.getHeight() - watermark.getHeight();
ImageUtils.overlay(img, watermark, x, y, 0.3f);
ImageUtils.save(img, "result0.jpg");
코드가 간결해지고 좀더 명확해졌다. 아래는 이미지 리사이즈와 오버레이를 실행한 결과 이미지이다.
ImageUtils(Kotlin 버전)
ImageUtils을 Kotlin 버전으로 만들어보았다.
package imageutils

import java.awt.AlphaComposite
import java.awt.RenderingHints
import java.awt.image.BufferedImage
import java.io.File
import java.io.IOException
import javax.imageio.ImageIO

@Throws(IOException::class)
fun open(filepath:String): BufferedImage {
    return ImageIO.read(File(filepath))
}

@Throws(IOException::class)
fun save(image: BufferedImage, filepath: String) {
    val p = filepath.lastIndexOf(".")
    val ext = if (0 > p || (filepath.length-1 == p)) "jpg" else filepath.substring(p+1)
    ImageIO.write(image, ext, File(filepath))
}

fun resize(image: BufferedImage, width:Int, height:Int, mode:Int = 1): BufferedImage  {
    var x = 0
    var y = 0
    var resizeWidth = width
    var resizeHeight = height
    when (mode) {
        1 -> {
            if (image.width > width) {
                resizeHeight = height * image.height / image.width
                y = if (resizeHeight < height) (height - resizeHeight) shr 1 else 0
            }
        }
        2 -> {
            if (image.height > height) {
                resizeWidth = width * image.width / image.height
                x = if (resizeWidth < width) (width - resizeWidth) shr 1 else 0
            }
        }
    }

    val type = if (0 == image.type)  BufferedImage.TYPE_INT_ARGB else  image.type
    val resizeImg = BufferedImage(width, height, type)
    val g = resizeImg.createGraphics()
    g.setRenderingHint(RenderingHints.KEY_ANTIALIASING, RenderingHints.VALUE_ANTIALIAS_ON)
    g.drawImage(image, x, y, resizeWidth, resizeHeight, null)
    g.dispose()

    return resizeImg
}

fun overlay(image: BufferedImage, waterImage: BufferedImage, x:Int, y:Int, alpha: Float) {
    val comp = AlphaComposite.getInstance(AlphaComposite.SRC_OVER, alpha)
    val g = image.createGraphics()
    g.composite = comp
    g.drawImage(waterImage, x, y, null)
    g.dispose()
}
이를 사용한 예제이다.
val watermark = imageutils.open("img1.jpg")
var img = imageutils.open("watermark.jpg")
img = imageutils.resize(img, 512, 512, 2)
val x = img.width - watermark.width
val y = img.height - watermark.height
imageutils.overlay(img, watermark, x, y, 0.3f)
imageutils.save(img, "result0.jpg")
마무리
지금까지 ImageIO을 활용한 이미지 처리를 간단하게 살펴보았다. 그리고 ImageUtils을 활용해서 좀더 편리하게 활용하는 방법까지 살펴보았다. ImageIO는 간편하게 사용하기에는 좋지만 완벽한 라이브러리는 아니다. 또한 오류가 있는 이미지 파일에 대해서는 처리중에 에러가 발생하기도 한다. 그렇기 때문에 현재 자신이 환경을 잘 파악해서 적용이 필요해 보인다.
부족한 글이지만 여러분에게 도움이 되었으면 하네요. 모두 즐거운 코딩생활되세요. ^^ ospace.
덧글: 참조[2]는 예전에 링크가 살아 있었는데 지금은 해당글은 사라지고, 다르게 변했네요. 그래도 참조 링크를 추가했습니다. 뭔가 기분이 묘하네요.
참고
[1] Class ImageIO, https://docs.oracle.com/javase/8/docs/api/javax/imageio/ImageIO.html
[2] Thumbnail(resizing) 생성과 Watermark적용, http://i-dev.tistory.com/61
'3.구현 > Java or Kotlin' 카테고리의 다른 글
| [java] springboot에서 mongodb 연동하기 (0) | 2024.02.13 |
|---|---|
| [java] java에서 ImageMagick 사용하기 (4) | 2024.02.02 |
| [java] POJO, JavaBeans, VO, DTO, PO, BO (0) | 2024.01.31 |
| [java] spring에서 event 사용하기 (0) | 2024.01.30 |
| [java] spring session 처리해보자 (0) | 2024.01.29 |


